Spring Cloud 微服务入门教程(三):微服务的注册
2020年02月20日 22:04:19 · 本文共 5,489 字阅读时间约 19分钟 · 3,842 次浏览
上一节我们讲了《Spring Cloud 微服务入门教程(二):服务注册与发现-Eureka》搭建了微服务的注册发现中心,这一节我们就讲一下如何新建一个微服务服务并且将服务注册到注册中心。
统一接口中心模块
在开始之前我先说明一下「统一接口中心」并不是微服务的标准架构,这个是我自己设计的架构,因为我觉得整个架构里会很多服务,服务之间要相互调用,而且团队合作中可能有很多人很多团队来写各自的服务模块,如果不规定好都有什么请求地址,什么样的请求对象和返回对象,就很难高效的协同,所以我会提前写好interface接口,定义好controller请求的地址、Request的结构、Result的结构,这样负责实现的服务的团队只需要实现interface接口就可以了,其他人调用的时候也之前要传什么类型的Request,收到什么样的Result。最后再次声明,统一接口中心是我自己设计的架构,并不包含在微服务体系里,仅供各位参考,可能并不适合你的业务形态,需要你自己设计,我只提供思路教程。
右击根项目名,新建一个模块叫api-center的maven子项目,就像上一节新建eureka模块那样,不再赘述,这里还需要新增一个依赖spring-boot-starter-web,因为这样可以把请求的URL地址也提前定义好,新建完成以后的POM文件是:
<?xml version="1.0" encoding="UTF-8"?>
<project xmlns="http://maven.apache.org/POM/4.0.0"
         xmlns:xsi="http://www.w3.org/2001/XMLSchema-instance"
         xsi:schemaLocation="http://maven.apache.org/POM/4.0.0 http://maven.apache.org/xsd/maven-4.0.0.xsd">

    <parent>
        <artifactId>cloud</artifactId>
        <groupId>net.renfei</groupId>
        <version>1.0.0</version>
    </parent>

    <modelVersion>4.0.0</modelVersion>
    <groupId>net.renfei</groupId>
    <artifactId>apicenter</artifactId>
    <version>1.0.0</version>
    <name>APICenter</name>
    <description>接口中心</description>

    <dependencies>
        <dependency>
            <groupId>org.springframework.boot</groupId>
            <artifactId>spring-boot-starter-web</artifactId>
        </dependency>
    </dependencies>

</project>
然后在api-center子项目的src/main/java中新建三个包:net.renfei.apicenter.service、net.renfei.apicenter.request、net.renfei.apicenter.result,在request这个包下新建一个class叫BaseRquest,作为请求体的基类并且实现Serializable序列化接口,再新建一个叫DemoRquest的类继承BaseRquest,里面有个成员字段String msg:
package net.renfei.apicenter.request;
public class DemoRquest extends BaseRquest implements Serializable {
    private static final long serialVersionUID = 1L;
    private String msg;
    public String getMsg() {
        return msg;
    }
    public void setMsg(String msg) {
        this.msg = msg;
    }
}
在net.renfei.apicenter.result包下我们新建一个Result类,这将来是我们统一的返回格式:
package net.renfei.apicenter.result;
import java.io.Serializable;
public class Result implements Serializable {
    private static final long serialVersionUID = 1L;
    private int code;
    private String message;
    private Object object;

    public int getCode() {
        return code;
    }
    public void setCode(int code) {
        this.code = code;
    }
    public String getMessage() {
        return message;
    }
    public void setMessage(String message) {
        this.message = message;
    }
    public Object getObject() {
        return object;
    }
    public void setObject(Object object) {
        this.object = object;
    }
}
然后我们在net.renfei.apicenter.service包下新建一个interface叫DemoService的接口:
package net.renfei.apicenter.service;
import net.renfei.apicenter.request.DemoRquest;
import net.renfei.apicenter.result.Result;
import org.springframework.web.bind.annotation.GetMapping;
import org.springframework.web.bind.annotation.PostMapping;
public interface DemoService {
    @GetMapping("/")
    Result index();

    @PostMapping("/sayMsg")
    Result sayMsg(DemoRquest demoRquest);
}
这样通过interface约定好了服务的地址、服务的名称、请求的类型和返回额类型,这就是DemoService的接口。
新建一个服务生产者
右击项目根目录,新建一个名为 demoservice 的空白maven项目,作为服务的提供者,并修改POM文件,这里依赖spring-cloud-starter-netflix-eureka-client、spring-boot-starter-web和apicenter模块:
<?xml version="1.0" encoding="UTF-8"?>
<project xmlns="http://maven.apache.org/POM/4.0.0"
         xmlns:xsi="http://www.w3.org/2001/XMLSchema-instance"
         xsi:schemaLocation="http://maven.apache.org/POM/4.0.0 http://maven.apache.org/xsd/maven-4.0.0.xsd">

    <parent>
        <artifactId>cloud</artifactId>
        <groupId>net.renfei</groupId>
        <version>1.0.0</version>
    </parent>

    <modelVersion>4.0.0</modelVersion>
    <groupId>net.renfei</groupId>
    <artifactId>demoservice</artifactId>
    <version>1.0.0</version>
    <name>demo-service</name>
    <description>演示服务</description>

    <dependencies>
        <dependency>
            <groupId>org.springframework.cloud</groupId>
            <artifactId>spring-cloud-starter-netflix-eureka-client</artifactId>
        </dependency>
        <dependency>
            <groupId>org.springframework.boot</groupId>
            <artifactId>spring-boot-starter-web</artifactId>
        </dependency>
        <dependency>
            <groupId>net.renfei</groupId>
            <artifactId>apicenter</artifactId>
            <version>1.0.0</version>
        </dependency>
    </dependencies>

    <build>
        <plugins>
            <plugin>
                <groupId>org.springframework.boot</groupId>
                <artifactId>spring-boot-maven-plugin</artifactId>
            </plugin>
        </plugins>
    </build>

</project>
然后新建包名:net.renfei.demoservice.controller,在resources中新建application.yml文件:
server:
  port: 18080
spring:
  application:
    name: DemoService
eureka:
  client:
    service-url:
defaultZone: http://localhost:8761/eureka/application.yml里设置了启动的端口、应用的名称和eureka的注册中心地址,其中http://localhost:8761/eureka/就是我们eureka注册中心的地址,见《Spring Cloud 微服务入门教程(二):服务注册与发现-Eureka》的配置过程。
在net.renfei.demoservice.controller包下新增一个DemoController并实现DemoService:
package net.renfei.demoservice.controller;
import net.renfei.apicenter.request.DemoRquest;
import net.renfei.apicenter.result.Result;
import net.renfei.apicenter.service.DemoService;
import org.springframework.web.bind.annotation.RestController;
@RestController
public class DemoController implements DemoService {
    @Override
    public Result index() {
        Result result = new Result();
        result.setCode(200);
        result.setMessage("You're visiting DemoService.");
        return result;
    }

    @Override
    public Result sayMsg(@RequestBody DemoRquest demoRquest) {
        Result result = new Result();
        result.setCode(200);
        result.setMessage("This is DemoService, Your Mag is: " + demoRquest.getMsg());
        return result;
    }
}
然后在net.renfei.demoservice包下新建一个DemoServiceApplication类作为模块的启动入口类
package net.renfei.demoservice;
import org.springframework.boot.SpringApplication;
import org.springframework.boot.autoconfigure.SpringBootApplication;
import org.springframework.cloud.netflix.eureka.EnableEurekaClient;
@EnableEurekaClient
@SpringBootApplication
public class DemoServiceApplication {
    public static void main(String[] args) {
        SpringApplication.run(DemoServiceApplication.class, args);
    }
}
与SpringBoot不同的是,新增了一个@EnableEurekaClient注解,这个就是Eureka的客户端,会向Eureka注册中心注册自己,到这里一个服务就完成了。
运行微服务注册
至此,微服务的注册发现就完成了,先启动eureka,然后启动demoservice,我们来测试一下吧。全部启动以后,并访问我们配置的eureka地址,这个就是注册中心,可以打开就是成功了,我这里的案例是:http://localhost:8761
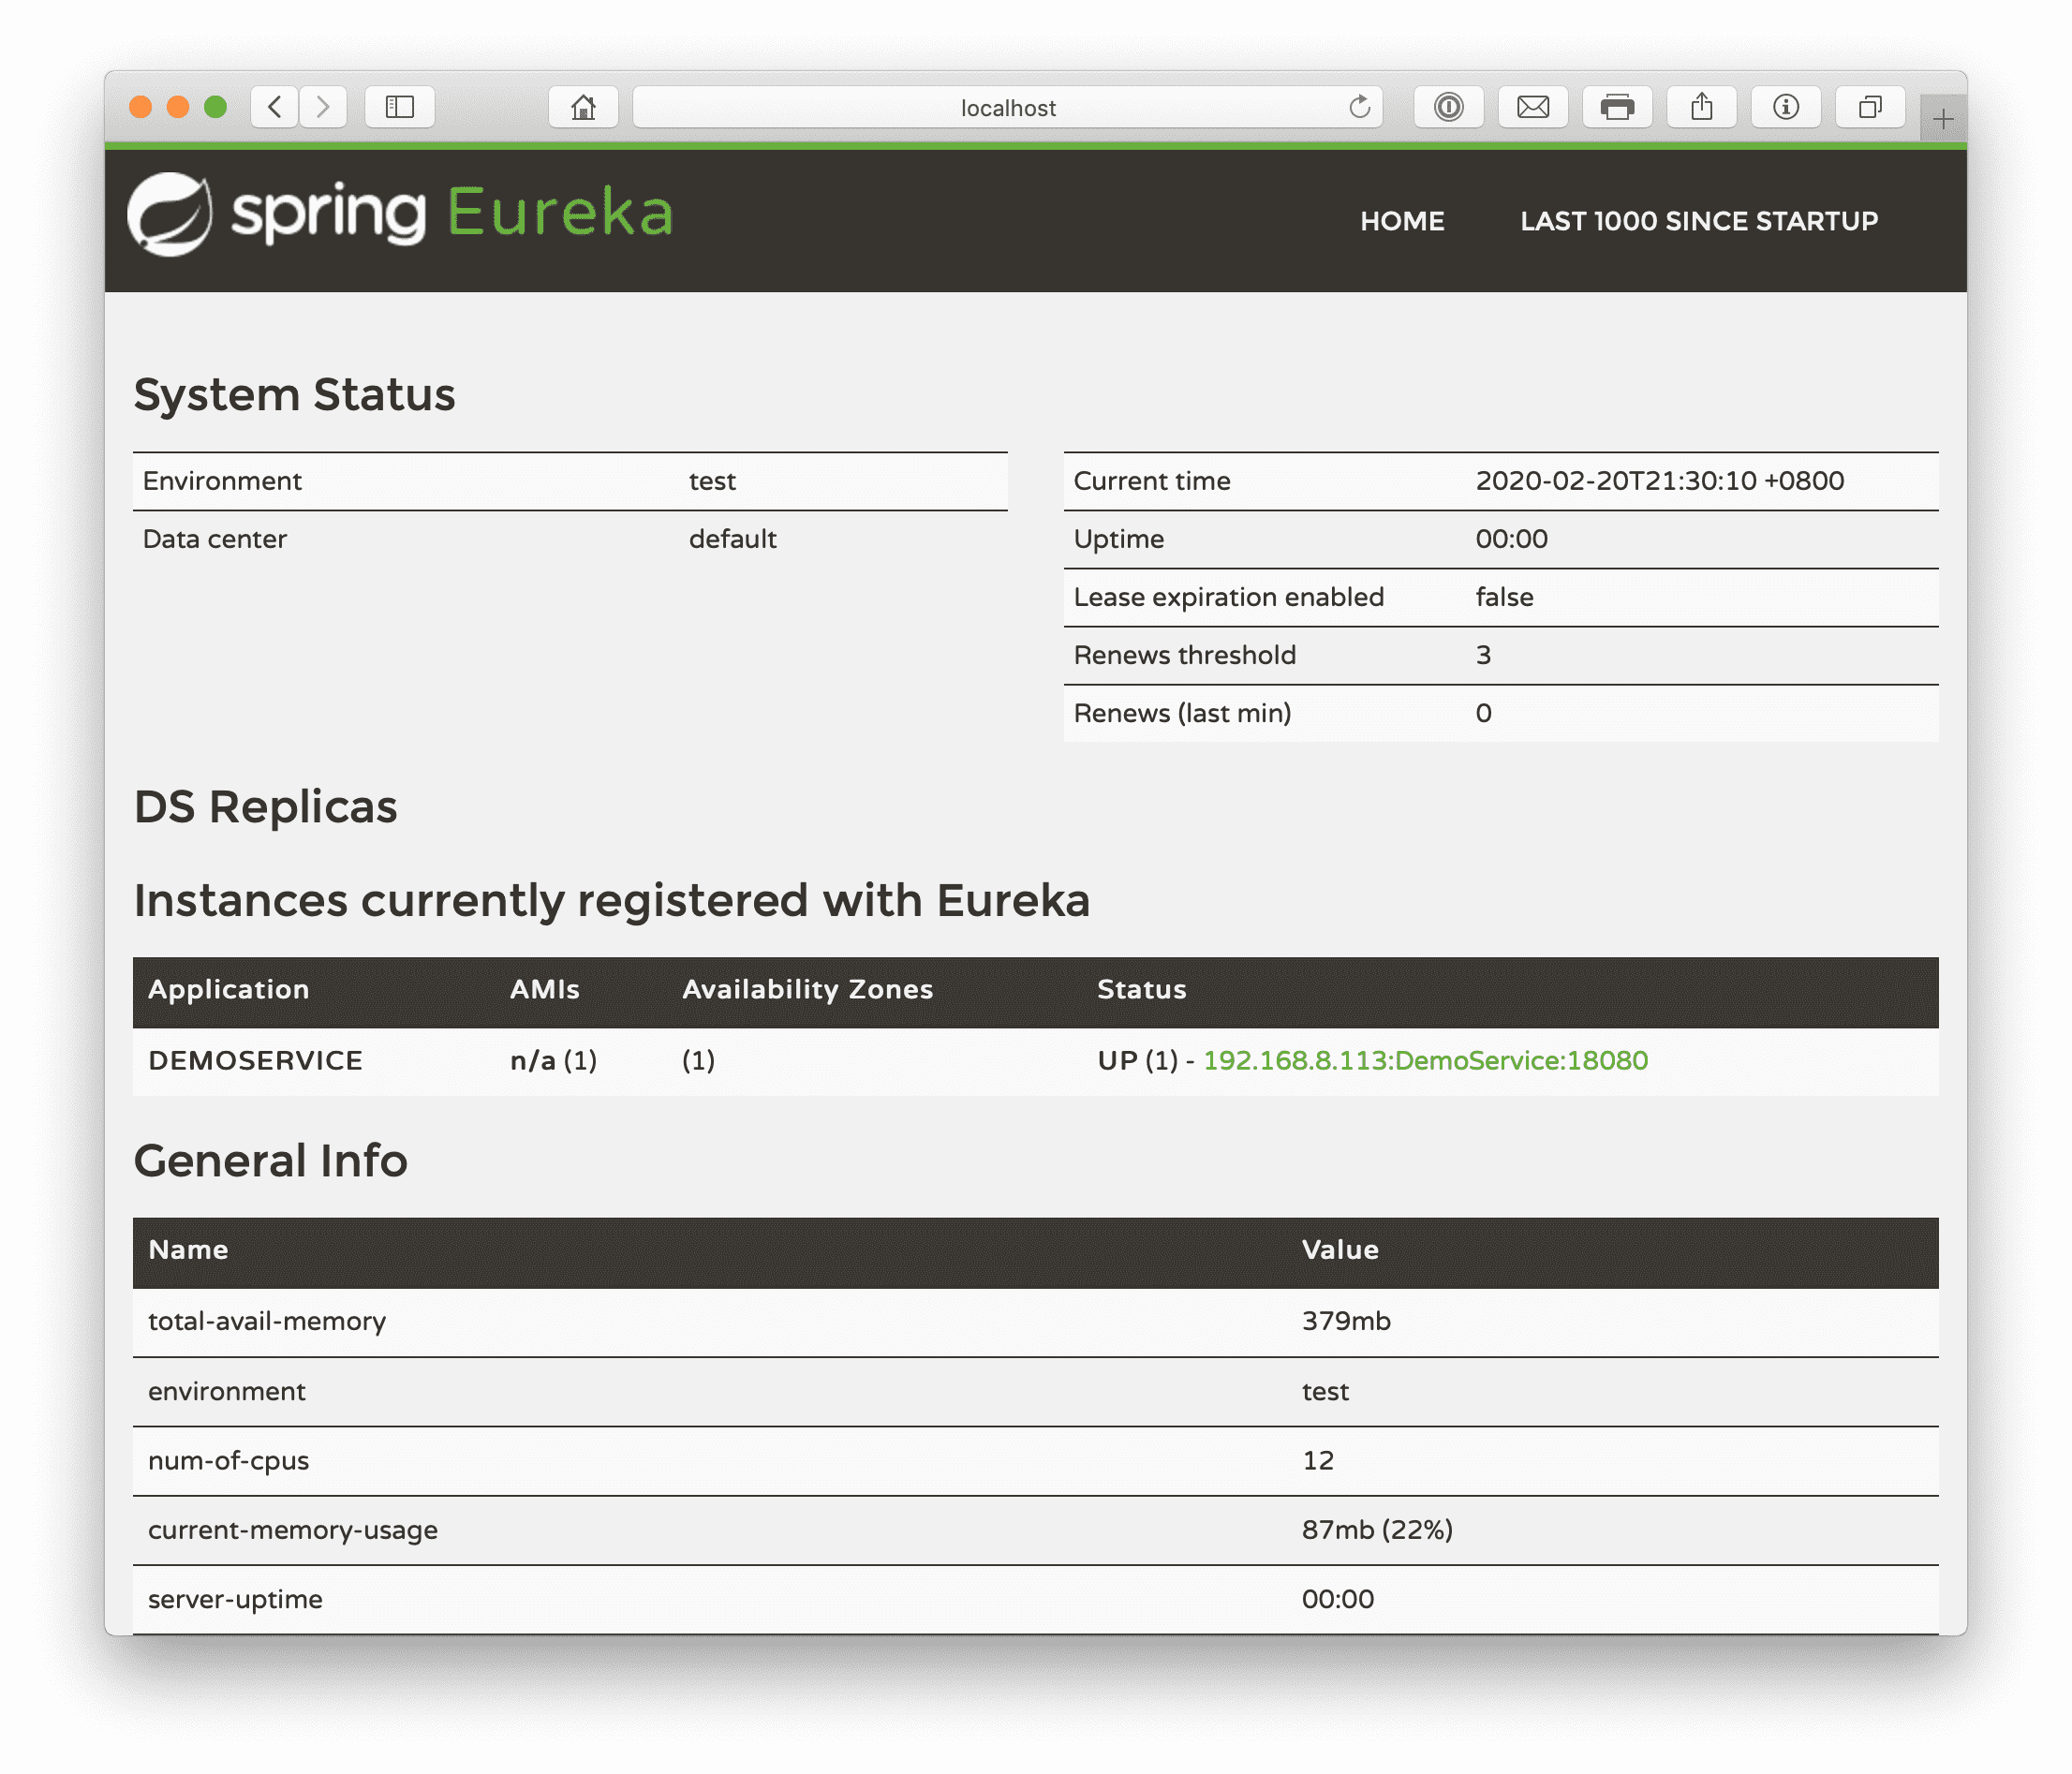
可以看到“Instances currently registered with Eureka”中已经发现了一个服务,“DEMOSERVICE”。
版权声明:本文为博主「任霏」原创文章,遵循 CC BY-NC-SA 4.0 版权协议,转载请附上原文出处链接及本声明。
原文链接:https://www.renfei.net/posts/1003323
相关推荐
猜你还喜欢这些内容,不妨试试阅读一下以下内容均由网友提交发布,版权与真实性无法查证,请自行辨别。

- 前后端分离项目接口数据加密的秘钥交换逻辑(RSA、AES)
- OmniGraffle 激活/破解 密钥/密匙/Key/License
- Redis 未授权访问漏洞分析 cleanfda 脚本复现漏洞挖矿
- CleanMyMac X 破解版 [TNT] 4.6.0
- OmniPlan 激活/破解 密钥/密匙/Key/License
- 人大金仓 KingbaseES V8 R3 安装包、驱动包和 License 下载地址
- Parallels Desktop For Mac 16.0.1.48911 破解版 [TNT]
- Parallels Desktop For Mac 15.1.4.47270 破解版 [TNT]
- Sound Control 破解版 2.4.2
- CleanMyMac X 破解版 [TNT] 4.6.5
- 博客完全迁移上阿里云,我所使用的阿里云架构
- 微软确认Windows 10存在bug 部分电脑升级后被冻结
- 大佬们在说的AQS,到底啥是个AQS(AbstractQueuedSynchronizer)同步队列
- 比特币(BTC)钱包客户端区块链数据同步慢,区块链数据离线下载
- Java中说的CAS(compare and swap)是个啥
- 小心免费主题!那些WordPress主题后门,一招拥有管理员权限
- 强烈谴责[wamae.win]恶意反向代理我站并篡改我站网页
- 讨论下Java中的volatile和JMM(Java Memory Model)Java内存模型
- 新版个人网站 NEILREN4J 上线并开源程序源码
- 我站近期遭受到恶意不友好访问攻击公告